

Agenda : To automate the Deployment process of the Git Source code, using Integration tools and Deployment tools by creating CICD Pipeline.
Tools Used :
- Terraform (Infrastructure Creation)
- Kubernetes (Kubeadm) (Master and Slave)(Deployment and Service)
- Jenkins (Created Pipeline) Continuous Integration Tool
- Git (Webhook Mechanism for Auto build jenkins pipeline and Source Code management)
- Docker (Dockerfile and creating containers )
- Ansible (playbook) (Configuration management tool)
- AWS Cloud for Creating Infrastructure and Ec2 instances
Links :
Git hub repo(terraform files) : github.com/MonishBhanushali/DevOps-Capstone..
Git hub repo( webapp-mongo application) : github.com/MonishBhanushali/webapp-mongo.git
Docker image : hub.docker.com/repository/docker/mohnishbha..
PART-1 Installation and Creation of Servers on AWS Cloud (Jenkins Server and K8s Cluster )
Process : 1) Install terraform and AWS CLI locally In your pc and Configure AWS IAM User for creation of Infrastructure in Cloud.
- Download Terraform and AWS CLI
- Install aws cli and add terraform.exe to path in environment variables
- Now aws configure –profile IAM_USER and add access_key and secret_key
- As both are added in Path variable we can use this application in any path of the file system
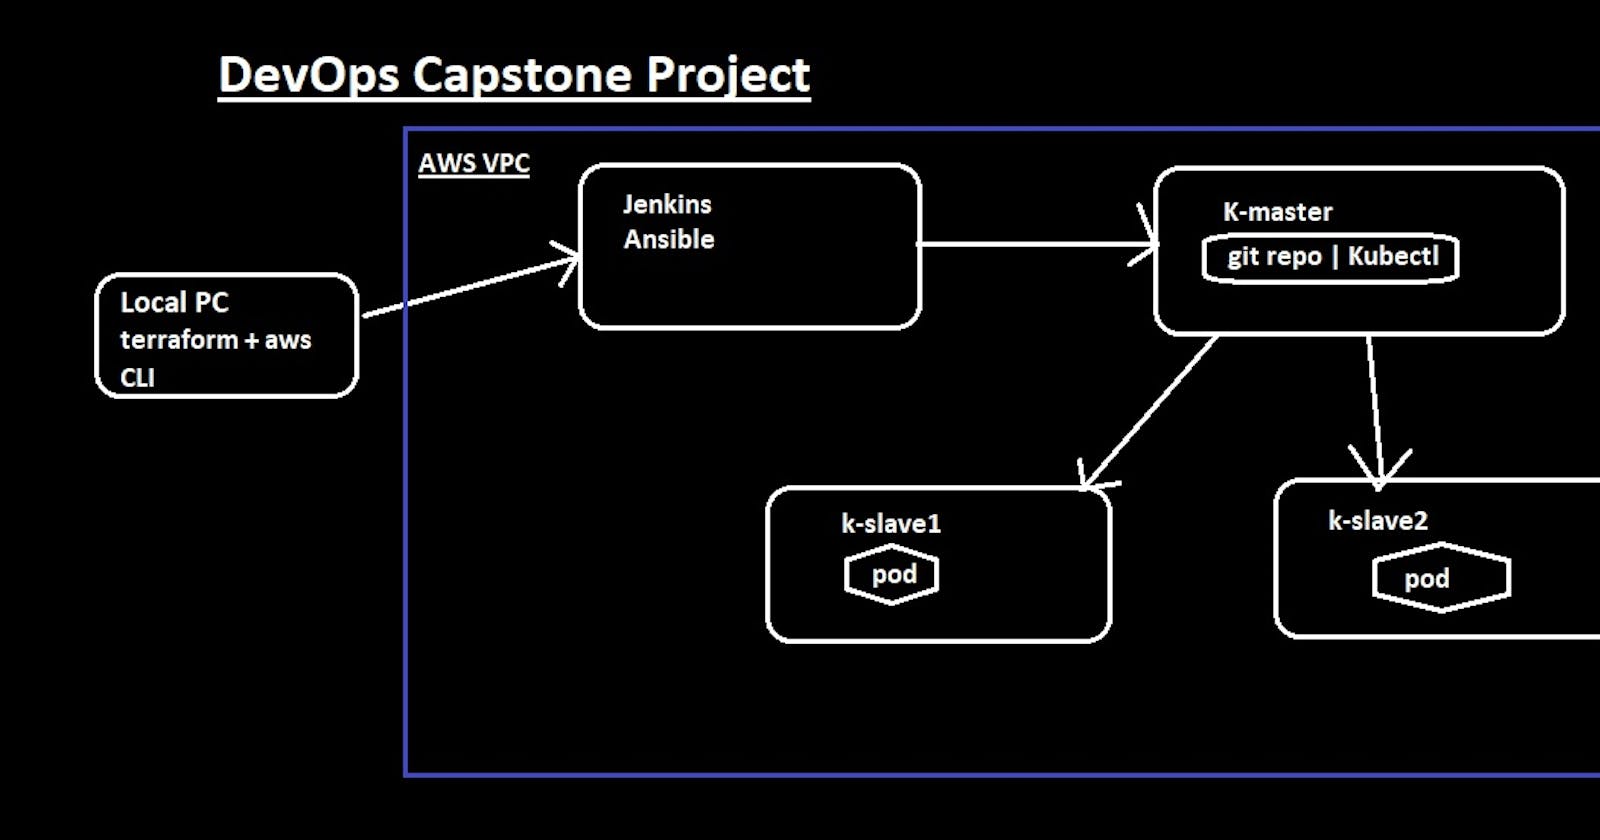
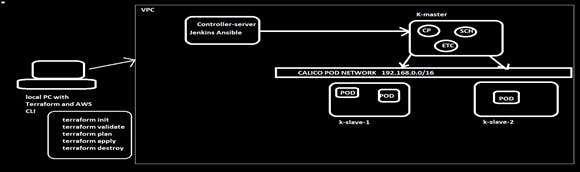
2) Once the IAM user is configured properly, Now you can create a cloud infrastructure i.e Servers for Kubernetes Control Plane (Master) and Worker Nodes Also we can create a Controller Server i.e will have Jenkins running on it with Ansible.
• Use controller.tf file
3) Use the above Git hub repo(terraform files) for the .tf files with user-data init.
4) We are using Kubeadm for Kubernetes Cluster creation and Calico for Pod Network.
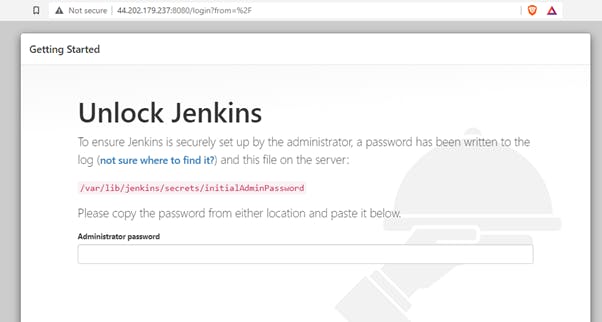
5) Once the Infra is ready we can check by using public-ip:8080 for controller server having Jenkins running on it.
## Step by Step approach
Step 1: Download Terraform and place it in C:/Users folder and add the path in Environment Path variable.
Step 2: Download and Install AWS CLI in local Computer the path will be get added in environment variables and .aws folder get created in C:/user folder
Step 3: Create a new IAM User with Required credentials or Configure existing user, Create a user-profile in aws cli like below:
aws configure –profile <user-name> add Access and Secret Key with it.
Step 4: Create a new directory in local name it as terraform1 (can be any name) Open this folder in Command line Interface or VSCode terminal.
RUN : terraform init
This will initialize a terraform in the directory and new .terraform folder will get created which will have .terraform-provider-aws_v4.21.0_x5.exe executable in it.
Step 5: Now create a new file name as provider.tf (can be any name) and add the below code in it.
provider "aws"{
profile = "devopsuser"
region = "us-east-1"
}
Here Profile is the User that you have configured already in Step 3. And provider is aws which can be any cloud providers. Here we are using AWS in this example.
Step 6. Now we need to check whether we are getting connected to AWS or not
RUN : terraform plan
This will give an error if User profile is not configured or User doesnot have access to the AWS Resources.
 Step 7 : if the User profile is correct it will work and give the infrastructure blue-print in the console like below: terraform plan
 Step 8: Now if we run the terraform apply command it will create a whole architecture in AWS Cloud like below:
Below are the files required to create a Basic Infrastructure in AWS Cloud
1) VPC.tf
resource "aws_vpc" "vpc" {                  # Creating VPC here
   cidr_block       = var.main_vpc_cidr     # Defining the CIDR block use 10.0.0.0/24 for demo
   instance_tenancy = "default"
   tags = {
                Name = "DevOps-vpc"
        }
 }
2) IGW.tf
resource "aws_internet_gateway" "IGW" {    # Creating Internet Gateway
    vpc_id =  aws_vpc.vpc.id               # vpc_id will be generated after we create VPC
    tags = {
                Name = "DevOps-vpc-igw"
        }
 }
3) Subnets (Public or Private) & Route Table and Its association
resource "aws_subnet" "publicsubnets" {    # Creating Public Subnets
   vpc_id =  aws_vpc.vpc.id
   cidr_block = "${var.public_subnets}"        # CIDR block of public subnets
   availability_zone = "us-east-1a"
   map_public_ip_on_launch = true
   tags = {
     "Name" = "public-subnet-DevOps"
   }
 }

 resource "aws_route_table" "PublicRT" {    # Creating RT for Public Subnet
    vpc_id =  aws_vpc.vpc.id
         route {
    cidr_block = "0.0.0.0/0"               # Traffic from Public Subnet reaches Internet via Internet Gateway
    gateway_id = aws_internet_gateway.IGW.id
     }
     tags = {
     "Name" = "public-subnet-DevOps-RT"
   }
 }

 resource "aws_route_table_association" "PublicRTassociation" {
    subnet_id = aws_subnet.publicsubnets.id
    route_table_id = aws_route_table.PublicRT.id
 }
4) Security Groups
resource "aws_security_group" "allow_sg" {
  name        = "allow_sg"
  description = "Allow traffic"
  vpc_id      = aws_vpc.vpc.id

  ingress {
    description      = "traffic from VPC"
    from_port        = 0 #80
    to_port          = 0 #80
    protocol         = "-1" #tcp
    cidr_blocks      = ["0.0.0.0/0"] #any subnet CIDR or vpc cidr
    #cidr_blocks      = var.main_vpc_cidr
  }

  egress {
    from_port        = 0
    to_port          = 0
    protocol         = "-1"
    cidr_blocks      = ["0.0.0.0/0"]
    ipv6_cidr_blocks = ["::/0"]
  }
5) EC2 - Instances (K- Master Control Plane) Here User-data should be in same Directory k-master.tf
resource "aws_instance" "k-master" {
  ami= "ami-0729e439b6769d6ab"
        count = 1
        instance_type = "t2.medium"
        subnet_id = aws_subnet.publicsubnets.id
        key_name= "key"
        user_data = "${file("kmaster.sh")}"
        security_groups = [aws_security_group.allow_sg.id]
        tags = {
                Name = "k-master"
        }
}
#!/bin/bash
sudo apt-get update
sudo apt-get install openjdk-11-jdk -y
sudo apt-get install python3.8 -y
sudo apt-get update
sudo apt-get install docker.io -y
sudo service docker restart
sudo curl -s https://packages.cloud.google.com/apt/doc/apt-key.gpg | apt-key add -
sudo echo "deb http://apt.kubernetes.io/ kubernetes-xenial main" >/etc/apt/sources.list.d/kubernetes.list
sudo apt-get update
sudo apt install kubeadm=1.20.0-00 kubectl=1.20.0-00 kubelet=1.20.0-00 -y
6) EC2 - Instances (K- Slave Worker Nodes)
resource "aws_instance" "k-slave" {
   ami= "ami-0729e439b6769d6ab"
        count = 2
        instance_type = "t2.micro"
        subnet_id = aws_subnet.publicsubnets.id
        key_name= "key"
        user_data = "${file("kmaster.sh")}"
        security_groups = [aws_security_group.allow_sg.id]
        tags = {
                Name = "k-slave"
        }
}
7) EC2 - Instances (Controller i.e Jenkins CI tool and Ansible CM tool)
resource "aws_instance" "Jenkins-server" {
        ami= "ami-0729e439b6769d6ab"
        count = 1
        instance_type = "t2.micro"
        subnet_id = aws_subnet.publicsubnets.id
        key_name= "key"
        user_data = "${file("controller.sh")}"
        security_groups = [aws_security_group.allow_sg.id]
        tags = {
                Name = "Jenkins-server"
        }
}
controller.sh
#!/bin/bash
sudo apt-get update
sudo apt-get install software-properties-common
sudo add-apt-repository --yes --update ppa:ansible/ansible
sudo apt install ansible -y
sudo apt-get install openjdk-11-jdk -y
curl -fsSL https://pkg.jenkins.io/debian-stable/jenkins.io.key | sudo tee \
  /usr/share/keyrings/jenkins-keyring.asc > /dev/null
echo deb [signed-by=/usr/share/keyrings/jenkins-keyring.asc] \
  https://pkg.jenkins.io/debian-stable binary/ | sudo tee \
  /etc/apt/sources.list.d/jenkins.list > /dev/null
sudo apt-get update
sudo apt-get install jenkins -y
EOF
8) terraform.tfvars this is file where constant values are declared
main_vpc_cidr = "10.0.0.0/24"
public_subnets = "10.0.0.128/26"
private_subnets = "10.0.0.192/26"
9) vars.tf the values are provided to variables like below:
#variable "region" {}
 variable "main_vpc_cidr" {}
 variable "public_subnets" {}
 variable "private_subnets" {}
Once the Infra is ready we can check that it is work properly or not by executing below Steps
1) To check whether the Controller-server or Jenkins-server is ready or not check the public-ip on Aws Cloud and run on browser like below. RUN : public-ip:8080
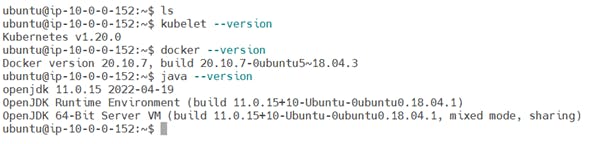
 2) Check for K-master having Kubernetes , Docker and JDK installed Successfully
 3) Now create a Kubeadm Cluster run below commands on K-master and K-slaves to make a cluster.
- sudo kubeadm init --apiserver-advertise-address= --pod-network-cidr=192.168.0.0/16
- Your Kubernetes control-plane has initialized successfully!
- To start using your cluster, you need to run the following as a regular user(i.e ubuntu):
- mkdir -p $HOME/.kube
- sudo cp -i /etc/kubernetes/admin.conf $HOME/.kube/config
- sudo chown $(id -u):$(id -g) $HOME/.kube/config
- • >>>>> To install pod network layer <<<<<
- kubectl create -f docs.projectcalico.org/v3.18/manifests/cali..
Once the above commands are executed successfully you will get the Join command like below which are executed on the slaves/worker nodes JOIN COMMAND:
kubeadm join <master-private-ip>:6443 --token 6ywy16.akw82kctduehshv7 \
    --discovery-token-ca-cert-hash sha256:67e151e12e81d60206e0f58637edfee4d0661e04e6d7a285e6c0cf556200cd34
4) Now goto K-master/Control-plane and check the Nodes are ready or not
kubetcl get nodes
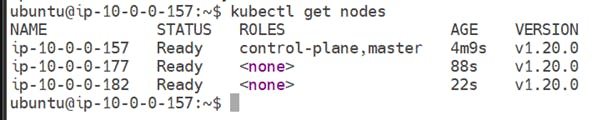
WE ARE SUCCESSFULLY CREATED A KUBERNETES CLUSTER USING KUBEADM AND CALICO POD NETWORK
PART-2 Deployment of webapp using K8s Objects like PODS, Deployment, Services using Jenkins Pipeline (CICD)
Step 1: Now login to Jenkins Server to get the password
sudo cat /var/lib/jenkins/secrets/initialAdminPassword
Step 2: Open the browser and use :8080 for Jenkins server URL
NOTE you will get data for Jenkins on directory : /var/lib/jenkins/
Step 3: Now we need to add the Nodes that Kubernetes Cluster to Jenkins So In simple words we can say we need to Connect the below servers to Jenkins-server (Controller-server)
- k-master-jenkins
- k-slave1-jenkins
- k-slave2-jenkins
So we will create a new public-private key pair on Jenkins Server and will copy the public key to the Authorized key folder of K-master, K-slaves Nodes as they can connect with Jenkins server
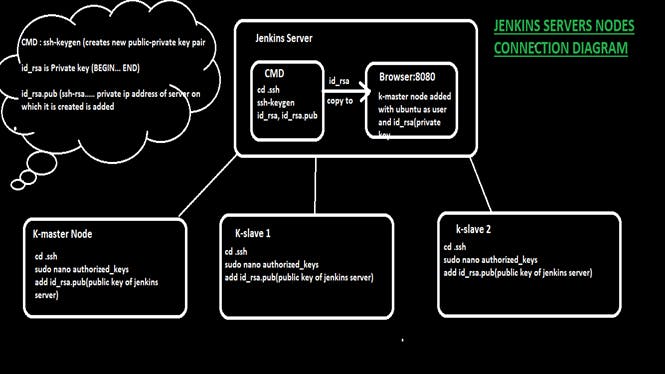
Connect to Jenkins server and run below commands
cd .ssh
ssh-keygen
ls
#o/p: authorized_keys  id_rsa  id_rsa.pub
sudo nano id_rsa #(Private) copy this to the Jenkins browser nodes connection global credentials with Ubuntu user and SSH-private key.
sudo nano id_rsa.pub #(Public) copy this to the authorized_keys of the servers (k-master, k-slaves) that wants to connect with Jenkins server
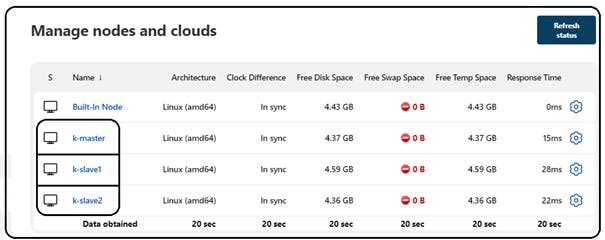
Step 4 : The Addition of all required nodes become suceessfull will look like below:
Step 5: Now we can create our CICD pipeline which will do the following tasks:
- Pull the code from git
- Will create a new Docker hub image whenever git is pulled
- Docker image is pushed to dockerhub
- Deploy stage is executed using Docker hub image
- Whenever new code is pushed the whole above cycle gets repeated
Step 6: GOTO -> Dashboard -> new Item -> create a pipeline here add the below stages to pipeline
- Pull the git repo on K-master node
- Create a Docker image from Dockerfile present in Repo
- Push the Docker image to Docker hub
- Now Run the Kubernetes stage which have yaml files in it, having dockerimages of mongo db and webapp.
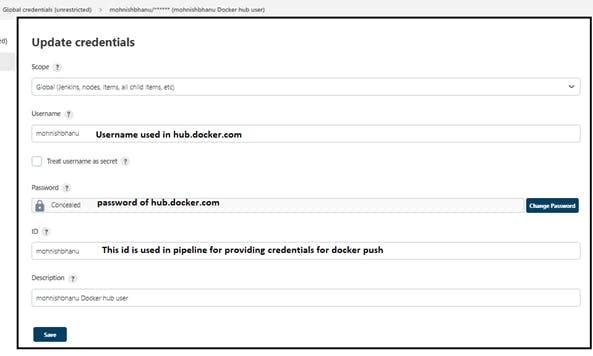
Step 7: Global Credential are added which are required in pipeline for git repo and dockerhub like below:
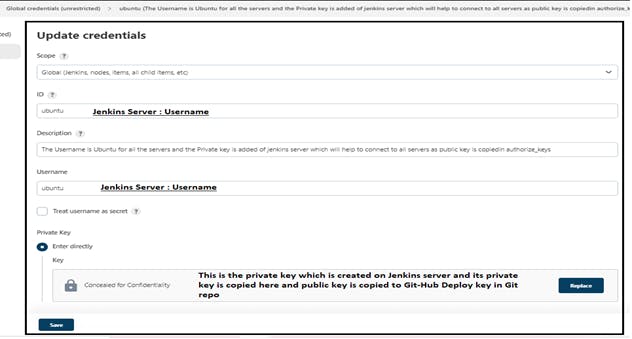
Step 8: Add the Docker Credentials in global credentials:
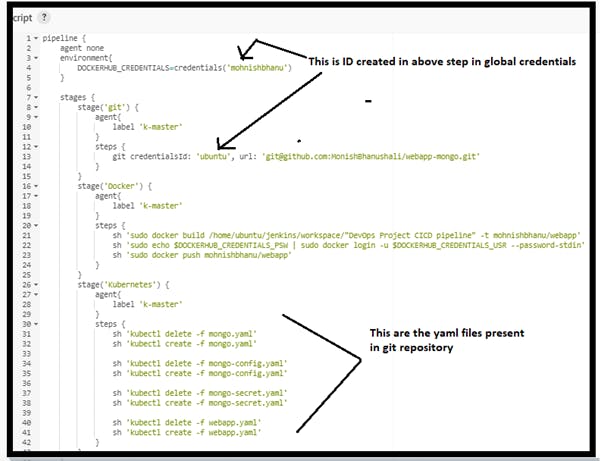
 Step 9: Now create a pipeline which will do automation tasks.
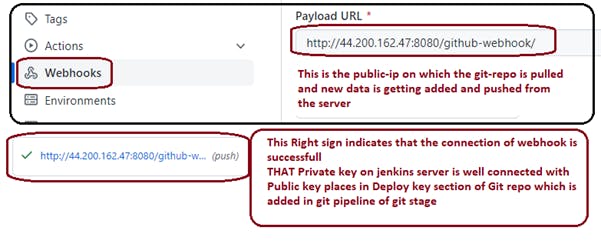
 Step 10: Add web-hook in git repo setting webhook URL like below :
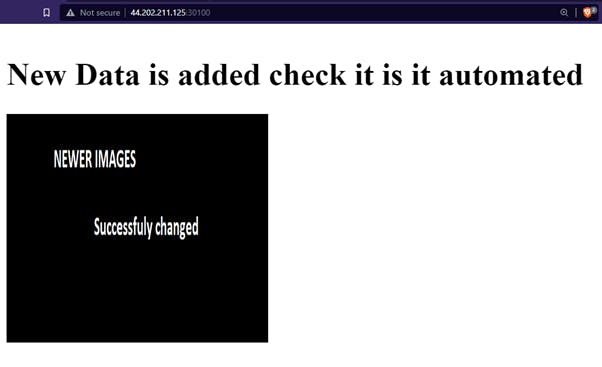
NOW TO CHECK WHETHER WE ARE SUCCESSFULLY CREATED A PIPELINE Lets Change some files in git repo and check the reflection on browser.
OLDER OUTPUT
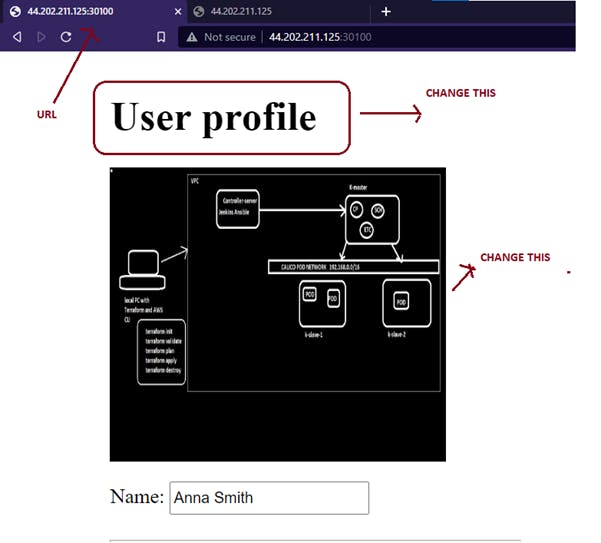
OUTPUT After changing and commiting to Git repo NEW
CONCLUSION: We have successfully created a CICD pipeline using Jenkins Continous Integration Tool with Git as a Source code versioning tool, Here we have create a whole architecture in AWS Cloud using Terraform Infrastruture as a Code and Deployed our application using Docker as a container with Kubernetes Kubeadm as an Orchestration tool which manages our Pod Calico Network and Pods